Oh snap!

on Wednesday, July 31, 2013

A few snaps of things we've been inspired by...


Follow us

Lower Prices!

on Monday, July 29, 2013

It's safe to say there is no better way to get back into the swing of things than to dive in head first :) So, we're really delighted announce the new prices of our wooden brooches! Previously they cost between £10 and £12 but we're really happy to be able to lower the price to only £7.50 each :D That includes our larger brooches and brooch sets including our teacup and teapot and our oui and non badges. Pretty great news, huh! 

All the profits made from these sales will go towards getting a new lens for my camera - silly thing broke during our travels :( Fingers crossed we will be able to save up enough soon to get a replacement. 

visit our brooch shop and make my day!
Follow us

Homeward Bound!

on Sunday, July 28, 2013


All good things must come to an end I guess! It's time for us to pack our bags and make the long trip back to the UK. We've had the most amazing time ever out here in America and I'd be pretty happy to stay out here if I could. We got the chance to see some incredible things and go on some pretty spectacular rides, not to mention spending some good ole fashioned quality time with Davids family. I'm so glad that I got to revisit some of my childhood memories and involve David in some old traditions, not to mention making a few new ones of our own too :D

I have to admit that I'm a little anxious of getting back into the swing of things when we get home. Running your own small business makes it pretty tricky to take a long break as there is so much stuff to pick up when you get back and no one to help you work out where to start. Fingers crossed the jet lag wont last too long and the sunshine follows us back to take the edge off things!

I'm really looking forward to unpacking all the treasures we picked up along our travels and going through some of our billions of pictures when we get home. I'll be sure to share lots of our inspiration and new collections when we've gotten settled too :) See you soon lovelies!
Follow us


NASA Adventure

on Saturday, July 27, 2013

Eeep! Isn't this the greatest robot you've ever seen? We met this litte fella during our trip to the Kennedy Space Center and needless to say, it was a totally freaking awesome day!


I was a little anxious that I would be disappointed with our trip here as my memories from way back when are the reason I became so obsessed with space in the first place, but I couldn't have been more wrong. If anything this visit was waaaaaay better as I could actually understand (a little bit better when I was a kid at any rate!) what they were on about half the time. That's right, now I feel like I'm a genius!


There was so much to see and do which I would love to yammer on about for the next few weeks, but I  don't want to bore everyone with my nerd chat! Instead, I'll give you a few of my favorite things. First up, I am OVER THE MOON that we got to see the real Atlantis Space Shuttle in the flesh. This is the ship that went into space over 30 times in various missions and was the one I watched the final landing of in total awe. It only arrived about a week or so ago (previously there was a life size model of the craft - that's now gone to Houston) so we couldn't have planned our trip more perfectly! I had no idea that I was going to see it before I came and (nerd alert!!) I almost welled up at the sight of it. It's fascinating how emotional you can get about things!


Atlantis awe aside, I love that they had lots of these spacemen outfits floating about in the roof of the main building. Unfortunately I couldn't get into one of those, but I got to do a space launch simulator which was a pretty awesome substitute instead :) It basically tilts you up on your back and throws you up into the air (though not far enough to require rocket fuel!) and it made me very very happy. I cant wait till they invent one that makes you feel weightless without going into a swimming pool.... actually, I'd totally go back to visit a NASA water park if that ever becomes an option :B Kickstarter anyone? Haha!


Oh! Check out this piece of moon rock! Isn't it a beauty? They actually only had a couple of samples for people to see, and the good bits were in these glass prisms which although looks cool, makes me sad I cannot touch them. I was really surprised that their gift shops weren't selling any meteorites or anything, because I would have spent a lot of money bringing us some rocks back home. Obviously it was for the best, but still a bit of a disappointment. I'm glad to report that was the only downside at least!


Finally, this is one of the suits worn during the epic Apollo 13 mission. Each space mission has a logo mascot created for it and they're made into patches like the one on this shirt pocket. Some of the designs are phenomenal (this has Pegasus's flying in front of the sun) and you can find them all within the museum showing the changes in design through the years. David and I are really into branding and design so were blown away by the creativity and depth behind each one. We managed to get a book with all of the different logos in it explaining what mission they were created for and the symbolism behind each element shown. We find things like that incredibly inspiring and were massively surprised when we discovered NASA was all about it too! It just goes to show that you can find inspiration anywhere if you go looking :)

All in all, the Kennedy Space Centre is totally worth seeing if you ever get the chance. I'm looking forward to going back in another 10-15 years to see what other cool new stuff they've discovered and invented ... and for some more of that incredible astronaut ice cream (which I ate an embarrassing amount of! Haha)

**Nerd Out**

DIY: How To Make A Glitter Fabric Pencil Case

on Thursday, July 25, 2013

I've been pretty obsessed with glitter fabric recently. There's something about it that makes me super happy... it's a lot of fun leaving a trail of glitter wherever I go :D This week I thought I would show you how I made my glitter fabric pencil case. Isn't it the greatest?

So, this is actually a really easy diy and it looks fabulous when it's done. It's really quick and easy to make as I've not added a lining to it, meaning you sew how you see and none of this flipping inside out stuff. Normally I would add a lining, but as this is stiff material and it has a really great cord material on the reverse, it's not really required. Plus the idea of trying to turn this stuff inside out brings a tear to my eye!


To make your own pencil case / make up bag / glory pouch you'll need:

a sheet of glitter fabric (good material shops/craft shops sell this, but I got mine online)
a zipper (it needs to be shorter than the length of your glitter bag)
2 little square pieces of material
scissors, an iron and a sewing machine


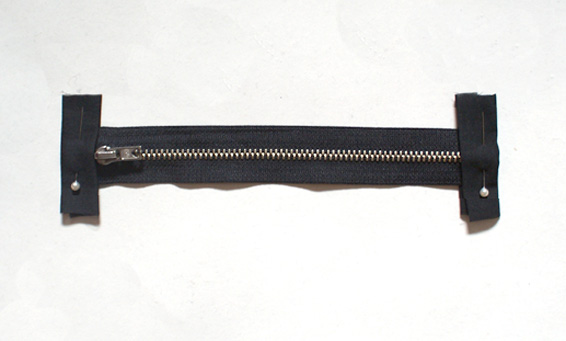
Start off by making little tabs for each end of your zipper. Do this by taking your fabric squares and folding each side to meet in the middle (like above). Lightly iron so it holds the shape, then fold in again so all the edges are inside (like above left). This means there will be no frayed edges for you. Hooray!


Pop each side of the zipper inside the folds and pin it together. This will neatly hide the ends of the zip and make it easier to attach straight on to your glitter fabric. Pin the sides down and then sew them together. Remember, when using your sewing machine not to stitch over the metal! If you do, you'll break the needle (and possibly curse a lot!)


Next up, pin the zipper to one side of your glitter fabric as shown above. You must make sure that the sides of the zipper match up the sides of your material, otherwise it'll look messy and get frayed quickly.


Run the glitter material and zipper through your sewing machine again. I used a straight stitch to do this, which looks a tiny bit wobbly because of the glitter. . . you can barely see it because it's so shiny and fun though!


Once you've attached both sides of your material to the zip, it'll look something like this. Perfect!


Using some (obvious!) pins, you can pin the glitter fabric together for stitching it closed. Take your time here as you'll need to match the material together perfectly. If you're a little squint, you'll need to trim your bag a little when you're done (no one likes a goofy edge!). 

Sew the last three sides together using a straight stitch again and you're done!


*Ta*Da*


It's just perfect, right? And it only took 10 minutes to make!


Now all the stationery in my handbag is hanging out in the cutest pencil case in town. Doesn't it look like it cost loads of money? And no one else has one! It just gets better and better :)

If you have any sewing tips or have other cool makes from glitter fabric we'd love to hear about them! 

Happy Making!
xox


Follow us

Through The Lens: Video With Rob Machado

on Wednesday, July 24, 2013

THROUGH THE LENS with Rob Machado from Through The Lens on Vimeo.

This short has been filmed really beautifully and is about a man and his love of turning his cars into wondrous vehicles and surfing with his besties. Really inspirational :)
Follow us

Inspiration: Vintage NASA Images

on Monday, July 22, 2013

As many of you will know, I'm pretty obsessed with NASA and space. In fact, it wasn't until my family took me to the Kennedy Space Center when I was a child where my imagination and interest was initially sparked. I wasn't even that excited to go (my brother was chomping at the bit!), but let me tell you, as soon as I stepped foot in that place my jaw dropped and I've never looked back since!


I was actually lucky enough to see one of the launches from where we were staying which is one of my favorite memories that I know for sure I will never forget! Well, today we're going to go back to NASA HQ and even though it's quite a different place to when I was a nipper (no more launches into space! BOO!!) I cant wait to get in there and explore the museum, discoveries and equipment... 


These are some of my favorite images from NASA's early days. Don't they look so 'future vintage'? They never fail to make me smile - especially the last one (best photo ever!) 


I hope you find these pictures as inspiring as I do. If these guys in the pool could go into outer space, absolutely anything is possible, right?

Here's to the bold men who went where no man has gone before.... and to one day, achieving that ourselves ;)

see more of our space posts and awesome space themed DIYs here
Follow us

Hey Hey! From Krustyland USA!

on Sunday, July 21, 2013


Can you believe it? Krustyland exists in real life! Did we stumble into Springfield? Heck yes we did!


Yup, we've turned into cartoon versions of The Simpsons for the day and landed in Universal Studios Orlando where we've been lucky enough to see Springfield come to life just after the doors opened a week or two ago. I don't really need to say this - but I will anyway - ITSFREAKINGAWESOMEHERE!!!


You can get yourself a giant Lard Lad doughnut, visit the Kwik-E-Mart, go on the awesome Krustyland 3D coaster and fill your boots at Krusty Burger!


Whist not the whole park has opened yet, we're absolutely thrilled with the experience we've had already. Hopefully we'll be able to come back when it's completed ... Though I've got a LOT of saving to do before that can happen!


In the meantime I'm going to kick back and enjoy our syrup only Squishee's and hit up the rides...


We'll catch you in Moe's for a pint of Duff - or even a Flaming Moe if you fancy :D - no jokes!!

Seaworld Vine Clips

on Friday, July 19, 2013


Pretty excited about all our little video clips so thought I'd share a little peek of what we've seen at Seaworld :D I'm not sure how well our holiday posts have been turning out on the blog as we're uploading from iPhones and iPads so I hope you can see them!


The first clip is of Shamu the killer whale and baby Shamu... They pretty much call all whales here the same name - or don't refer to their names at all so we never know who we're watching. To be fair, Shamu seems to get around a bit. I'm pretty certain this is not the same whale I saw back in the day, but the idea of having to tell children that Shamu died is pretty insane, so I'm alright with the smoke and mirrors ;)


The other clips are of the phenomenally cool Stingrays who are in a giant touch tank. They high five everyone who they swim past which is pretty much the coolest thing ever. Needless to say they're super friendly and a lot of fun to touch as they feel almost slimey! And I've also shared a short clip of me hanging out with my dolphin friend. Absolutely incredible, right? For more clips you can follow us @vividplease through the Vine app on smartphones. I'll be uploading some more clips to twitter when I can :)


Seaworld Orlando


Hello from Seaworld! Today we've been hanging out with Shamu and his friends and it has been phenomenally good :) check out my new bestie! He is a total riot!


I have fond memories of going to Seaworld when I was a kid, but that was more than 10 years ago so I wasn't really sure what to expect after all these years. Im not a massive fan of animals in captivity and whilst I feel like the tanks could be much bigger and the dolphins and killer whales could be given a bit more 'free time', it was nice to see that they had been working with so many injured animals that wouldn't survive in the wild but thrive from their environments here.


It was pretty incredible to find penguins in Florida too! You have to enter a giant refrigerator to go see them which is really novel for us because we have penguins in our zoo in Edinburgh but they hang outside in our standard weather... That speaks volumes!


I think my favourite thing about the park is being able to see the dolphins swimming through a big tank. Its the closest a girl can get to living under the sea so you can imagine I was in my element, imagining life as a mermaid! Unsurprisingly I now have a vast amount of dolphin pictures and underwater vine films that I can't wait to look through when I get home :)


Oh! We also got a chance to go on the incredible Manta ride, where you get strapped into a rollercoaster and laid out flat so you're in a "flying" position before hitting loads of loops at a ridiculously high speed (and they even squirt water at you at one point!) it has to be one of my top 3 favourite rides of all time as its pretty much the closest thing I'll ever get to experience actual flying. Totally worth the fear factor if you ever get the chance to come here!

DIY: How To Make Washi Tape Stickers

on Thursday, July 18, 2013
 

Hello from Florida!
A short but sweet diy for all you lovelies this week, using one of my all-time favorite supplies; washi tape! I don't know about you, but we're addicted. They just make absolutely everything look so much better! Anyhoo, today I'm sharing how you can make stickers out of your washi tape collection :)


The great thing about this diy is that you can do it with only one or two tapes, or you can do it with hundreds! I love that you can mix and match the patterns too, so it can be as eclectic as you like :D

Aside from your washi tapes, you'll also need some wax paper, like parchment paper or baking paper. This'll make it easier to peel off your stickers when you're ready to stick them.

Finally, if you have any circle cutters (like this one) these are perfect to get a round circle with litte faffing. Alternatively, you can use a pen and a pair of scissors.


To make your stickers, stick down your washi tape onto the waxy side of your paper. Make sure each to overlap each type of tape, otherwise they wont stick together when you cut them out. 


Once you're ready, start punching out those circles! Because the tape is stuck to the wax paper, it'll cut like a dream :) For those of you using a pair of scissors, turn over your washi tape wax paper and using a pen, draw the circles (or any other shape for that matter) on the reverse. When you cut it out, there won't be any pen on your stickers. Brilliant!


*Ta*Da*
I've made lots of these and have a cute little jar full of them on my desk. Each time I want to add a little flourish to something dull, I pop one out, peel off the backing and go to town. Every one is unique and super pretty - spectacular!

Happy Making!
xox
Follow us