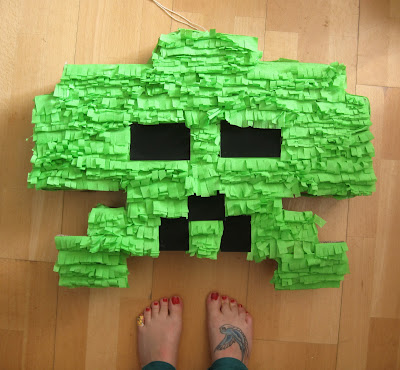
It's my birthday! And that means one thing... time for a party :D
This week David and I made a super awesome Space Invader piñata full of my favourite sweeties to shoot down at the party. I know, perhaps the coolest party idea ever! I've always wanted to get a piñata, but smashing up a donkey isn't my kinda thing. Space Invaders however, definitely are!So to make your own piñata (whatever awesome shape it may be), you will need:
cardboard
tape
glue (pva / mod poge etc)
a marker pen, scissors and ruler
crepe paper
string
and candy. Lots of candy!
Piñata's are surprisingly easy to make, but they are quite time consuming, so make sure not to leave it till the night before!
To start, you need to draw out your shape. We did this by creating a grid on the cardboard, using 2x2 inches squares. You can adjust this to a more appropriate size if you want your pinata to be bigger or smaller of course. Then, using your marker, fill in where your main features will be for a guidance...
As you can see, we mis-judged this the first time round, which is why we worked it out and marked it up now :D So, once you are all marked up, cut out your shape. As a Space Invader has little pincers at the very bottom, we've decided to leave these out for now and add them in later. The simpler your shape the easier of course. Also, don't worry about how rough it all is now, you're going to cover it all up :)
Look at that handsome guy!
Next, you'll need to make the back... How? Use your new Space Invader friend as a template. Easy peasy! When cutting out this part, remember to cut on the inside of your marker line - you don't want it to be larger than the front.
So start wrapping your card strips around one of your space invader template's and tape them down. You can't see the tape here as I have stuck it on the outside as it is much easier than sticking it on the inside, plus you wont see the mess when you're done so it doesn't matter.
Lovely! Now remember to leave a flap at the top to fill your sweets in, otherwise your mates will hate you when they've busted it open!
Then tape the front on. Ahhhhh, so satisfying! Again, remember to keep that flap at the top open for now, we will deal with it shortly.
Next I taped crepe paper all over my new 3d shape. This means that if any of the fringing fails to cover its area, we wont be seeing tape and card. This is an optional step, so if you're feeling a bit lazy don't worry about it. We have also drawn our guidance squares back on - in the correct places this time :)
Now, fringing.
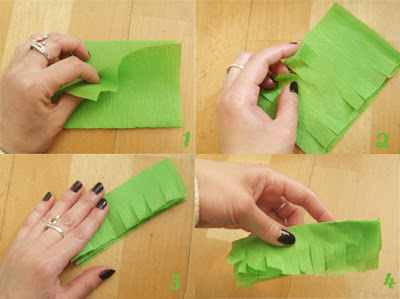
To make a crepe fringe, take a rectangular piece of crepe paper and fold it in half as shown in picture 1. Then snip into the two long sides. Try and keep these snips evenly spaced appart, but don't stress if it's not accurate! Make sure not to cut all the way across and to leave a strip down the middle un-touched. Fold in half like in picture 3 and ruche the fringe with your finger tips like in picture 4. Perfect!
Start gluing down all your fringing, overlapping each row as you go. Start at the bottom of your shape and work your way to the top. You will need to do this on the front and back, but you can leave out the sides if you have covered them up with the normal crepe paper. It will look grand and save a bunch of time :)
Now that we are getting on well with the fringing, I'm going to add on those pincers. Cut out from flat cardboard (I don't feel these need to be 3d fancy) I've glued them just on the corners of the shape under the fringing and then put a fringe on them too. As you have probably noticed by now there is a lot of fringing going on. It's pretty hardcore, but it looks incredible!!
See! Phew! We are on track and things are looking pretty awesome. Next up, stick down some black squares for the features and then a sugar break...
One for me and one for the Space Invader ;) haha!
Now that's all done we can put all the candies inside. Open the slot, pour the sugar confetti and any other prizes you like (as long as they aren't too heavy!) inside and tape the flap shut. Then cover it with some more crepe paper. Hooray! It's going to be soooo fun when this space invader explodes!
You will need to pierce a hole in the lid of your piñata so you can get some string in it to hang it up. Mark a cross in the top center of your shape (can do this on through the lid if you like), pierce a hole and thread through your string. Double knott it on the inside and you have yourself a hanging loop. Brilliant! You can also use wire or even a cable tie here -- just whatever you have lying around will do :)
*Ta*Da*
Crikey! What a great job done :D Now all you need to do is grab your mates and a bat to bust out those goodies... Excellent!
We would love to make loads of these so it's like a proper game of Space Invaders. How awesome would that be?!
Hooray!
We hope you enjoyed learning how to make the coolest piñata in town :) We would love to hear what shapes you would make for your birthday... or better yet see them!
Enjoy
xox


0 comments:
Post a Comment