I don't know about you, but I am in love with these little neckties!
They are more retro than you could possibly imagine, and have been cropping up everywhere lately. Today I though I would share with you how I made mine, which is currently going down a storm!
This tutorial is quite simple but a little fiddly in stages. You will be creating your own pattern and sewing it all together. It wont take long but it will take a little bit of concentration, but you'll see it's worth the effort!
You will need:
cute fabricmeasuring tape
needle and thread (or sewing machine)
scissors
paper + pen (a fabric pen too if you have one)
snap fasteners
First up you will need to get the length of your necktie. Using the measuring tape, measure all the way around your neck and add a couple inches extra to create the lovely crossover part. I have quite a small neck so made my measurements 22 inches in total.
We will be creating this in two parts, so for the pattern, draw out a long rectangle at half the length. I've made mine 3 cm wide as this will fit under my shirt, but you may want to check this depth against your outfit of choice if you're not sure. As I want a wide tail for the cross over, I've made the wide end 6 cm in depth.
The easiest way to get both ends the same is to draw out your pattern, fold it in the middle and draw in where your wider part is going to go. Then (still folded) cut around the pattern. This means if it's got a lovely curve to it, you don't need to stress out over recreating it!
Next, pin your pattern to the fabric and cut it out. You will need to leave a few mm all the way round so when you turn it inside out it wont come apart at the seams. You will need to cut out two of these for the project; I've found the easiest way to it is to draw around the pattern while the fabric is still pinned to make sure I keep right when sewing. Then remove the paper and repeat for the second half. If you're worried about leaving a mark, you could use chalk, a pencil or a fabric pen.
Now we sew!
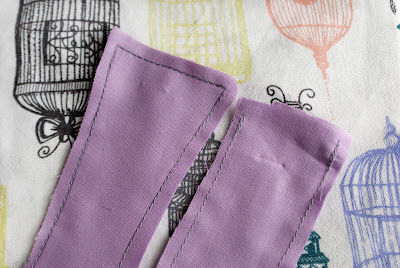
Using a sewing machine (or by hand if you don't have one), stitch the two pieces of pinned fabric together. Make sure you leave a gap at the thinner end and remember to back stitch at the beginning and end so the thread doesn't unravel. Do this for both halves of your necktie, then turn each inside out through the gaps...
Next we will be joining the two halves together to make one heck of a neck scarf!
To do this, we will be working with the two 'open' parts of the material. As you can see, the edges are raw and threading, which we wont want on our finished piece (even if it is hidden behind our collars!)
Carefully tuck the raw seems inside the material as shown above. Simply push it inside a few mm deep so it doesn't accidentally pop back out again. Do this stage for both parts. To keep your new edges flat, give it a wee iron. Good work!
Pin the two pieces together where they will meet and stitch them together. If you have a sewing machine it would be best to stitch with a zigzag rather than a straight stitch otherwise it will be super tricky to keep together when you're working on it. This is the most fiddly part of the project so take your time and remember that you are so very nearly done :)
Hooray!
Look at that! Good work, right? Now all you need to do is add your detailing...
To add your snap fastener, try on your new neck scarf and work out where you would like it to go. Make a little mark with pencil to keep you right (it will be hidden under the snapper so don't fret about it)
*Ta*Da*
Look at that! Super cute, right? Now you have a lovely new accessory to add to your adorable collar collection and know how to make them in every colour for every outfit. Brilliant! But you don't have to stop there, why not hand paint in some chevron patterns... or maybe add a little bit of embroidery detailing? We'd love to hear what you would do with yours!
Hope you enjoyed this weeks tutorial...
Happy Making!


0 comments:
Post a Comment