Showing posts with label space. Show all posts

Inspiration: Vintage NASA Images

on Monday, July 22, 2013

As many of you will know, I'm pretty obsessed with NASA and space. In fact, it wasn't until my family took me to the Kennedy Space Center when I was a child where my imagination and interest was initially sparked. I wasn't even that excited to go (my brother was chomping at the bit!), but let me tell you, as soon as I stepped foot in that place my jaw dropped and I've never looked back since!


I was actually lucky enough to see one of the launches from where we were staying which is one of my favorite memories that I know for sure I will never forget! Well, today we're going to go back to NASA HQ and even though it's quite a different place to when I was a nipper (no more launches into space! BOO!!) I cant wait to get in there and explore the museum, discoveries and equipment... 


These are some of my favorite images from NASA's early days. Don't they look so 'future vintage'? They never fail to make me smile - especially the last one (best photo ever!) 


I hope you find these pictures as inspiring as I do. If these guys in the pool could go into outer space, absolutely anything is possible, right?

Here's to the bold men who went where no man has gone before.... and to one day, achieving that ourselves ;)

see more of our space posts and awesome space themed DIYs here
Follow us

DIY: How To Make Constellation Cards

on Saturday, February 9, 2013

As most of you will know, I'm pretty obsessed with space. With Valentines Day just around the corner I figured there would be no better excuse to indulge in creating a special DIY inspired by my love of constellations. This one is for all you star crossed lovers... get it?


This tutorial is really simple, cheap and it only takes a few minutes to make something really special. The best part is you probably have the things you need to make it already at home. Grab yourself a blank notecard (or fold a piece of card in half), a needle, pencil and some thread. I'm using embroidery thread as it'll stand out really nicely, but you can use just about anything.


The best way to start this project is to map on the card where your constellation stars will be. Using a pencil, mark out little crosses or stars for guidance. You could even join the dots to keep you right for where you're going to be stitching. 


Above is a quick guidance I made of 4 awesome constellations which you can copy / trace onto your card. You're welcome ;) You can google these if you wish to add in more stars (some of them are epic, these are simplified for ease and speed), or alternatively you could look through some Zodiac signs which would be amazing for birthday cards :D


The easiest way to stitch through card is to pierce the holes first. Using your needle, make holes in all the pointers of the star. I've started by creating Xs which is a simpler way to do things, but having 6 points instead of 4 is much nicer if you have the time...


Start by going through the inside of the card so your knot and 'messy' thread will be hidden till the card is open. Once you're done stitching, you could cover this up by sticking a little piece of paper over it; that'll protect your artwork too. Cross over all your stitches so each look like an x or *


To make sure everyone can make out the constellation, it's nice to add a little line of thread between each star. I did this as I went along, but you can always fill them in later if you're not sure you want to add them.


Oooh! Pretty! To finish it off you can use a silver pen to add in a few more stars to that beautiful night sky...


Beautiful! 
I think I'm going to make the whole set and pop them on my wall. Educational and pretty. Neat, huh! 

We hope you have fun making these starry starry night cards :)

Oh, and Happy Valentines Day when it comes! 

Vicky & David 
xox
Follow us

DIY: How To Make A Space Invader Pinata!

on Monday, September 3, 2012
 

It's my birthday! And that means one thing... time for a party :D
This week David and I made a super awesome Space Invader piñata full of my favourite sweeties to shoot down at the party. I know, perhaps the coolest party idea ever! I've always wanted to get a piñata, but smashing up a donkey isn't my kinda thing. Space Invaders however, definitely are!

So to make your own piñata (whatever awesome shape it may be), you will need:
cardboard
tape
glue (pva / mod poge etc)
a marker pen, scissors and ruler
crepe paper
string 
and candy. Lots of candy!


Piñata's are surprisingly easy to make, but they are quite time consuming, so make sure not to leave it till the night before! 
To start, you need to draw out your shape. We did this by creating a grid on the cardboard, using 2x2 inches squares. You can adjust this to a more appropriate size if you want your pinata to be bigger or smaller of course. Then, using your marker, fill in where your main features will be for a guidance...


As you can see, we mis-judged this the first time round, which is why we worked it out and marked it up now :D So, once you are all marked up, cut out your shape. As a Space Invader has little pincers at the very bottom, we've decided to leave these out for now and add them in later. The simpler your shape the easier of course. Also, don't worry about how rough it all is now, you're going to cover it all up :)


Look at that handsome guy!
Next, you'll need to make the back... How?  Use your new Space Invader friend as a template. Easy peasy! When cutting out this part, remember to cut on the inside of your marker line - you don't want it to be larger than the front. 

Then decide how wide you want your piñata to be and cut out several strips to go around your shape. Ours is about 4inches wide... as a 3d shape, that will take millions of sweets!!


So start wrapping your card strips around one of your space invader template's and tape them down. You can't see the tape here as I have stuck it on the outside as it is much easier than sticking it on the inside, plus you wont see the mess when you're done so it doesn't matter.


Lovely! Now remember to leave a flap at the top to fill your sweets in, otherwise your mates will hate you when they've busted it open!


Then tape the front on. Ahhhhh, so satisfying! Again, remember to keep that flap at the top open for now, we will deal with it shortly.


Next I taped crepe paper all over my new 3d shape. This means that if any of the fringing fails to cover its area, we wont be seeing tape and card. This is an optional step, so if you're feeling a bit lazy don't worry about it. We have also drawn our guidance squares back on - in the correct places this time :)


Now, fringing.
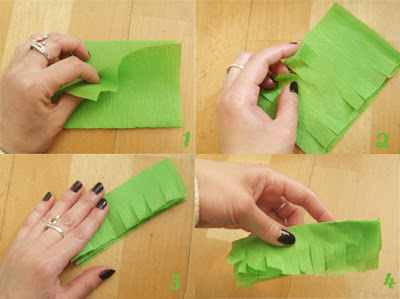
To make a crepe fringe, take a rectangular piece of crepe paper and fold it in half as shown in picture 1. Then snip into the two long sides. Try and keep these snips evenly spaced appart, but don't stress if it's not accurate! Make sure not to cut all the way across and to leave a strip down the middle un-touched. Fold in half like in picture 3 and ruche the fringe with your finger tips like in picture 4. Perfect!


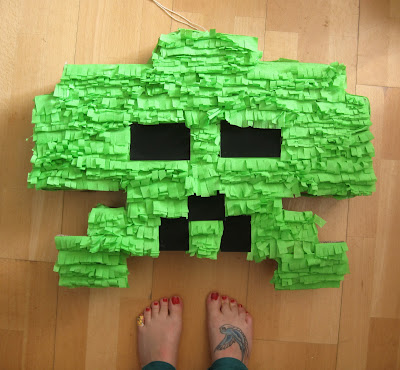
Start gluing down all your fringing, overlapping each row as you go. Start at the bottom of your shape and work your way to the top. You will need to do this on the front and back, but you can leave out the sides if you have covered them up with the normal crepe paper. It will look grand and save a bunch of time :)


Now that we are getting on well with the fringing, I'm going to add on those pincers. Cut out from flat cardboard (I don't feel these need to be 3d fancy) I've glued them just on the corners of the shape under the fringing and then put a fringe on them too. As you have probably noticed by now there is a lot of fringing going on. It's pretty hardcore, but it looks incredible!!


See! Phew! We are on track and things are looking pretty awesome. Next up, stick down some black squares for the features and then a sugar break...


One for me and one for the Space Invader ;) haha!
Now that's all done we can put all the candies inside. Open the slot, pour the sugar confetti and any other prizes you like (as long as they aren't too heavy!) inside and tape the flap shut. Then cover it with some more crepe paper. Hooray! It's going to be soooo fun when this space invader explodes!


You will need to pierce a hole in the lid of your piñata so you can get some string in it to hang it up. Mark a cross in the top center of your shape (can do this on through the lid if you like), pierce a hole and thread through your string. Double knott it on the inside and you have yourself a hanging loop. Brilliant! You can also use wire or even a cable tie here -- just whatever you have lying around will do :)


*Ta*Da*
Crikey! What a great job done :D Now all you need to do is grab your mates and a bat to bust out those goodies... Excellent!

We would love to make loads of these so it's like a proper game of Space Invaders. How awesome would that be?!


Hooray!
We hope you enjoyed learning how to make the coolest piñata in town :) We would love to hear what shapes you would make for your birthday... or better yet see them!

Enjoy
xox

Follow us

Style Me Friday....

on Friday, July 13, 2012
Galaxy Girl
                     dress Romwe                               silver clutch bag ASOS
           moon clock Think Geek                            Air, Moon Safari HMV
            nail varnish Paul & Joe                           shoes Irregular Choice
      space ice cream Amazon                             great bear brooch Tatty Devine

DIY: How To Make A Moon Cushion

on Monday, July 9, 2012

We've got the whole moon on our sofa!
Pretty sweet, huh? If you are as much of a fan of moon things as I am, you will be itching to give this little tutorial a go. It's a little bit fiddly to sew a round cushion, but it is totally worth the effort. What's brilliant about the project is that once you have an idea how to do this, you can start thinking up what other amazing pillows you can make without breaking the bank!

All you need is:
picture of the moon (you can get them for free from the Nasa website!)
2 circles of fabric (white fabric for the front and whatever you like for the back. I used black)
image transfer paper for your printer 
greaseproof paper
a needle and thread (or sewing machine & some skills to pay the bills) 
an iron 
stuffing; I used 100% polyester toy stuffing, but you can always up-cycle an old pillow if you have one hanging about.

Ready? Get set...


To start, size your picture of the moon to whatever size you want your cushion / pillow to be. Then flip it! You will need to use a mirrored image when working with most image transfer paper, but make sure you read your instructions first as your brand of paper may vary from mine. You will need a few mm bleed around the image so make sure you give it a little extra space on the page too. Print out your image on plain paper first to make sure you are happy with it before going any further.

When you are good to go, print it out and leave it for 5 mins to dry. Then using your iron on the hottest setting with the steam setting switched off, iron it picture side down onto your white fabric. Do this by pressing the iron quite hard and moving it slowly around the image. Make sure to give attention to the edges too! Our paper has a heat activated pattern so we have a good idea when we're done, but having used several different brands over the years, this stage normally takes about 10-15 minutes to have the picture printed on your material. Take your time :)


When ready and the paper has cooled a little (it will be scorching!), gently peel off from the top and smoothy pull the paper all the way off. If you found the image is a little streaky from the transfer, place a little greaseproof paper over the image and give it another quick iron. That should smooth it out and make it nice and bright.


To attach the moon to the backing fabric you will sew your two round pieces of material together with the image on the inside. This is so all the stitching will be hidden when you're done. A good way to make sure you sew around the rim of the moon is to draw around the edge of it on the reverse side so you know where to aim for with your needle. Use a few pins to keep the two pieces of fabric together whilst your sewing. Then using either a needle and thread or your sewing machine, stitch 3/4 of the way round the moon, backstitching to secure the thread at the beginning and the end. 

Once complete, make little snips all the way around the rim, making sure you are close to the seam but not cutting it. This will allow the flaps to overlap when you flip it inside out and stuff it, making it smooth and round rather than pinched and frustrated...


That's the hard part all done! Good work :D
Now, using that gap you left, pull your moon through so it is the right way round. If it's crumpled you can give it a quick iron with the greaseproof paper again. Then, start stuffing! Add your stuffing in lots of little bunches opposed to one big lump as it will sit better. Once your cushion is nicely plush and plump, carefully stitch the gap closed... 


*Ta*Da*
You just made the greatest cushion ever! Now whenever you say "I love you to the moon and back" you know exactly how far that distance will be. Clever and pretty :D We have a lot of moons in Vivid HQ and it's not hard to see why after this little make-a-thon; they're simply beautiful! With galaxy prints being hot right now this is a great way to bring a little space fun into your home on a budget. Next up you can make Mars, Venus & Pluto too... Brilliant!

We hope you enjoyed this weeks diy and we'd love to hear if you're crazy about this little moon too :)

Happy Making!
xox

Follow us

Over the (Super)moon!

on Monday, May 7, 2012
For those of you who are followers of our blog, you will know that I am a space nut!
With this year's Supermoon making its appearance on Saturday, we were glued to the sky waiting to see this amazing phenomenon. As you can see, it was worth the late night!

This beautiful supermoon is caused by the moon traveling closer to planet Earth than usual on its elliptical orbit. When the moon appeared at its biggest, it was only 221,457 miles away, which is a whopping 17,149 miles closer than its usual distance! Crikey!

Known to astronomers as a Peigree full moon, the moon appeared 14% bigger and 30% brighter as it passed closer to us. If you were in a spot with a clear sky, you got the chance to create the most stunning images imaginable! We couldn't resist sharing our favorite snaps as we are so mesmerised by the event. Pretty awe inspiring, isn't it?


We'd love to share your snaps too if you stayed up to take them :D 
Make sure you comment below with your links and stories of how you're moon day went!

*High Fives to all Space Nuts*

Style Me Friday...

on Friday, March 30, 2012
Holy smokes!

1 i'm as free as a nerd: david and goliath                                     2  astronaut ice cream: space boosters
bubble tea: bubbleology                                                                   4 sequined shorts: topshop
642 things to draw: chronicle books                                           6 jailhouse rock dvd: amazon
peanut butter lip balm: asos                                                           8 lilac hair dye: directions

This friday we thought we would share a wee peek at our recent purchases and our new  favorite things! With the sunshine starting to come out and play, we have been getting really excited for summer. It's seems so near yet so far away! We hope these things bring a smile to you as much as they have to us... 
Bring on the BBQs!

Happy Friday!